Sunday, March 3, 2019

Time Out House Retreat

HHHEEELLLLLLOOO!
I know I don't post often but I did go to a newish Craft Retreat House
this past weekend and thought I should do a little write-up
about it!

Time Out House Retreat is located in Gore, OK, USA
they can also be found on Facebook

True to what their website states, your GPS really will
NOT get you to the house! You do have a short dirt road but it is not difficult to find! My first impression was it looked like a very small & plain house then I went inside!

>   >>   >>> Interesting Decor in Living Room >>>   >>   >
just don't rely on any of the clocks to have the correct time
although one time the clock I called out happened to be stopped only 
5 minutes from the actual time, which threw me off because I
kept thinking it was right! LOL


THE CRAFT ROOM
We entered the Craft room first which is conveniently located
by the drive & parking area. That made unloading/loading a snap.
While there are tables & bedding for 10, there were only 4 of us this time
(an unfortunate bout of the flu took out our 5th). We set up the craft room in zones for
paper crafts, a pour paint station & our various tools we took along. The house
offers many tools (Big Shot, Cricut, guillotine cutters, various papers & embellishments)
for an attendee to use!

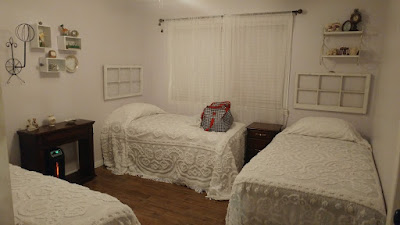
SLEEPING AREAS
 First room sleeps 3
 Second room sleeps 4
Master Bedroom sleeps 3
We had 2 in the Master and 1 on each of the other rooms. All of us
agreed the beds were very comfy. I thought the sheets smelled
especially good and were very soft, a friend mentioned
how great the pillows were!

BATHROOMS
Front Bath
Master Bath
Both bathrooms were very clean and tastefully decorated, nothing super elaborate
but really who needs that? The towels were clean & fuffy and plenty of them
were provided along with soaps, lotions & air fresheners. Plus a place
for dirty towels was provided in each (I really like that!)

COMMON SPACES
 Chat Area (sit & visit or dress up & have a photo shoot with
items found in the wicker basket)
 
 Toasty (electric) Fireplace in Living Room
 Nicely stocked kitchen (appliances of all kinds), beautiful dishes & cutlery, plus
bake ware and lots of hot pads & kitchen towels.
Dining table that seats 8 plus 2 at the adjacent bar lets everyone
have a place away from their crafty space for meals & snacking.

LOADING & PARKING
 Yep there's my car parked right in the middle of the driveway but since
3 of us rode together it was ok, only 1 other vehicle needed a spot. 
I love this loop drive! Next time we go there will be more vehicles
and we know we won't have to worry about someone being blocked in!
This is also a part of the loop drive and at the far end of the house
past those chairs is a parking area our other friends van is parked in.
I am standing in the doorway of the outside Craft Room door to take these two pictures,
you can see it is super close for unloading/loading and with the ice & snow
that we got, it worked great for us!

At the moment, March 2019 there is no central heating or air conditioning but
the owner has gotten a price to put it in and has plans to make that happen!

The rates are very reasonable and the owner is really nice! I recommend this house
to you & your 9 closest friends

Monday, August 6, 2018

Monthly Stamping Fun

Did you know Brutus Monroe has a Stamp Club?
Did you know it's only $5?
Did you know you get a discount on other products just for being a member?

It's all true! Today is all about the STAMP CLUB!

Card #1:
 I started off with one Acrylic Bubble and a alcohol ink marker
simply painted it! The clear makes them so flexible for so many things,
I consider them a basic necessity

I stamped the Double Scoop image twice on Lunchbag Cardstock
and the sentiment once.
After fussy cutting one of the images out, I colored the other 
with Souffle pens but decided I really didn't like it.

So I moved on & colored the fussy cut image with alcohol markers.

Again, I really didn't like the outcome. I decided to color over the
fussy cut image using Distress Oxide inks and a tiny paintbrush.

Ahhh much better on the ice cream cone so I went ahead
and glued them together. Then using Silver Wire (from the Dragonfly Gardens
Inspiration Box) I made an "ice cream cone stand"
which I attached to my card face then filled in
with clear Nuvo drops!

I thought the cardface looked too flat. Using the
Sugar Cone Surface Ink Cube, I directly applied ink
to the top right & bottom left corners.

Using ribbon from my vast collection (I have boys, why do I have so much ribbon?)
The perfect embellishments came in the form of these three different colored
Pastel Pearls. Pairing a Sea Envelope to complete this sweet card! 


Card #2:

I kept super simple
I simply used dies & layered it up (ink distressing each layer as I went)
Unfortunately I have lost the other sentiment that came with this adorable image :-(


Card#3:

I failed to take photos while making this one because I was having so much fun!
But it is Super easy. I started with some Mixed Media paper which I sprayed with water.
Next I used Brutus Monroe's Surface Sprays in Phonebook, Rouge & Jurassic
and just the let colors run. After drying with a heat tool, I trimmed 1/8" off all
sides to get rid of the heavy pooled colors. I stamped the image, put a little water
on the vase and dropped a tiny bit of Cornflower Surface Spray, just letting
it bleed. I put it all together, finishing it off with some

Monday, July 30, 2018

You Stack Up!

Brutus Monroe has such great stamp designs but
that isn't all, the cardstock is beautiful!

Starting with Tea Time Stamp Set and 6 colors of B.M. cardstock

I stamped the stacked teacups on all 6 colors plus white using

I cut each image

not just that, I cut each cup from each color then restacked them all

Again I stamped the stacked cups, this time 6 times on plain white cardstock. 
Using Brutus Monroe Craft Glue, I reassembled each and cut them out.

These funky stacked circles seemed like the perfect match for the stacked teacups.

I also decided no stack of  teacups should be without a doilie. I used 
the Leah - Mandala Die from Brutus Monroe and thick white cardstock. 

After choosing which cup stack I was using, I strategically cut each
color, the largest cut from a 5.25x5.25 black square to next the piece back
together in.

With so many colors in the image, I thought the sentiment should be kept simple
but needed a little bit extra, embossing time! I used the Brutus Monroe Embossing Ink

This sparkley white ribbon seems to hold it all together plus
a few drops of Nuvo Glitter Drops and a bit
of Clear Nuvo to make the straw stand out!

Monday, July 9, 2018

To Have and To Hold


I am so excited to be a Guest Designer for Brutus Monroe during the month of July!
Thank you so very much for this opportunity and I hope I don't disappoint.
I'm using Rose Border Stamp set along with Detail Ink in Raven

After stamping image, I heat set the ink to make sure it was completely dry. Then I watercolored using a bit of water mixed in with the Surface Sprays I had sprayed on my Large Media Mat
and a small paintbrush to watercolor.

After stamping my chosen Sentiment on white cardstock, I trimmed it down to
1/2" wide then 'v' clipped both ends.

I knew I wanted a black cardbase so I created a liner and
chose a sentiment from the Super Sentimental Stamp Set

With all the pieces gathered together, I'm ready to assemble. Using Brutus Monroe Craft Glue I work from the top layer down, Rose Border onto stripped paper onto green cardsock, next the black ribbon is added and the sentiment strip, while that is dry I attach the liner inside the cardbase, and attach the assembled front of the black cardbase. Last I add a few Clear Bubbles and some miscellaneous sequins.


Saturday, March 3, 2018

Hello Sunshine Tag

First let me say this is actually the first time blogging from my phone. LOL

I have been using lots of Brutus Monroe products lately and I'm loving this young company. Here's my most recent creation:


I used so many Brutus Monroe products on this one! Surface Sprays in Oz, Jurassic, Phonebook, and Rouge; the gorgeous Jennifer Mandala Die; birdcage & birds from Angel Wings; sentiment from Feb's Unicorn Dreams box. Coloring on birdhouse is surface inks in speckled egg & sage (the only 2 colors I have so far)

The pink bling, twine & jute are from ms. sparkle & co in magenta (a gift from my friend Pam, thanks girlfriend). I also used Tom Holtz Distress Ink in Squeezed Lemonade & Mermaid Lagoon to color the little birds. Blue bling is really old stuff from Basic Grey.

Sunday, January 28, 2018

Friends, Coffee & Crafts

Seriously what more could a person ask for?!
/\ /\ /\ The Inspiration Photo /\ /\ /\

FRIENDS:
I have this friend, Deb, who I use to be on a design team with.
That group dissolved but not our friendship!
She is absolutely one of the most wonderful people &
I hope that one of these days we get to meet IRL!
And now she & her friend, Celeste, have started this
wonderful thing about well...
Friends, Coffee & Crafts

/\ /\ /\ Isn't this fabulous paper? /\ /\ /\

COFFEE:
I am such a coffee simpleton.
I drink it black and strong.
My coffee is so strong in-fact that at work I'm not allowed
to make it as strong as I want it to be or the men all whine!
When I'm splurging I'll make Vanilla coffee, ooo ahhhh

/\ /\ /\ The Card /\ /\ /\

CRAFTS:
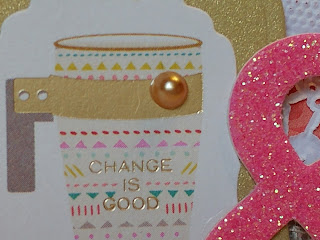
Here's what I came up with using the inspiration photo
TaDah!
Coffee mugs were die cut from Pink Paislee 6x6 pad
called Turn the Page, it's fabulous due to the Gold Foil!
Of course I had to use some Gold on the card.
When I showed it to my 20-year old son, he really
liked the doily and how it looks like a table cloth. Success!
Sentiment stamp is from Unity Stamp Company
but I have no clue which set because I cleaned-up too soon.
This is a problem with me. I like my work space clean ;-)
The lighter background teal paper which is white core,
I dry embossed with a tiny dot folder then
distressed the dots to make them pop!
That big blingy pink & was in some stuff a friend
(Laura Beth) gave me in Minnesota almost two years ago.
A bit of pearl bling & small length of lacish ribbon.

Hope you've enjoyed!
Now go visit my friends, DEB & CELESTE

Saturday, January 13, 2018

Spring At Last

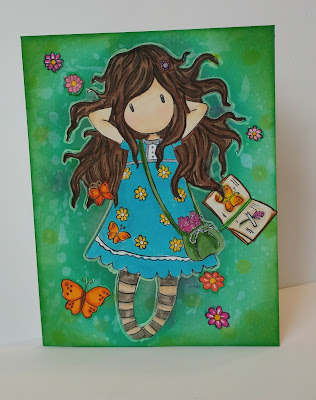
I have fallen in love with Santoro images. They come in different sizes, the minis you can from from around $2. Medium are a little over $7 and is my favorite size. Then there are some high ones, I'm talking 8"tall for the one I purchased which I think was over $12 (I only have one, they're just too big for me).

For today's card (standard A2), I uses Spring At Last which I just received this week in my Blitsy order! It comes with not only this great image, she's about 5" tall, and the little flowers, butterfly & book come in the kit as well. Plus a few images I didn't use like a bee & postage stamp.


I stamped thr image using Memento in Tuxedo Black, colored with Copic markers. The b.s. ground I made with Tim Holtz Oxide & regular Distress inks.

Here's what the package looks like, so you even have a coloring idea